Powering up the Studio
The first aspect of this exercise concerns the powering up of the studio. When powering up the studio there are some essential points that must be adhered to. The first is that Amps/Speakers are ALWAYS the last to be powered up, and ALWAYS the first to be turned off when preparing and finishing recording sessions. Another important point relates to the mixing desk, it is vital that the desk is neutralised before turning on, and also neutralised at the conclusion of a recording session. To help with remembering the order in which to power up the studio there is the acronym DORA, this stands for:
- Deck = Mains power
- Outboard = Racks
- Recorder = Pro Tools, 8 track, etc.
- Amps = Amps, powered speakers.
Below is the power up order we followed for our session in Studio:
- Turn on Mains power.
- Turn on power to the rack.(pictured below, the power switch is on the far right hand side, at the top of the rack.)
- Turn on the power to the 192 Pro Tools interface. (pictured above, the 192 is positioned on the left hand side of the rack, just under the patch bay.)
- Fire up the computer.
- Desk (check if it is neutralised) *see neutralise desk below.
- Turn on the power to the desk.
- Power up the amp/speakers.
The following information notes how to neutralise a mixing desk. Please note that this is how the desk should be left after a recording session:
- Every switch should be up.
- All faders should be down
The following applies to all channels from the top row of pots to the bottom row:
- The top pot/nob (mike pre-amp) turned anti-clockwise all the way.
- The next six pots/nobs, (Equalisers) should be left in the centre.
- The next six pots/nobs, (Auxiliary) turned anti-clockwise all the way.
- The bottom pot/nob, (Pan) should be left in the centre.
- The pots/nobs that aren't in the channel rows (situated on the right side of the desk) should all be turned anti-clockwise all the way.
Setting up a Recording Session with Pro Tools
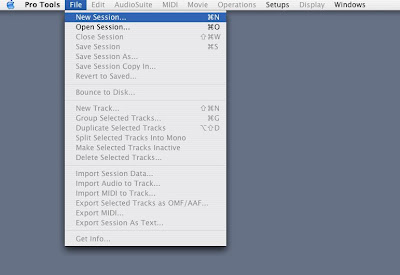
The first step is to click on the Pro Tools icon situated on the Dock at the bottom of the screen to open up Pro Tools. (note this is the process for Macintosh's with OSX) Next click on the File menu and click on 'New Session' (pictured below). A new session can also be opened up using the shortcut "Apple + N".
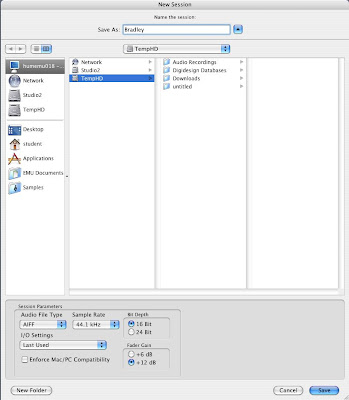
 After opening up a new session, a window will appear (pictured below). In this window settings can be made for 16 or 24 bit, whether to save as an AIFF etc. what Hz setting and where the file is to be saved to.
 Once a new session has been opened up a track(s) has to be opened/added. This is done by going to the File menu and clicking on 'New Track'. (The shortcut is 'Shift + Apple + N') A small window will appear asking how many tracks, for this exercise we only needed one track. Below shows a Pro Tools recording session window (the big window), also to the right is the mixing window. Both are showing only one track.
Getting a Signal Through to Pro Tools from the Dead Room
Set up a microphone and plug it into the input for channel 1 in the junction box in the dead room. Next in the control room, patch the dead room output, (channel 1) into the input for channel 1 that leads into the desk. Pictured below is the junction box for studio 2, the row of inputs/outputs shows that this canon plug is the only one coming out of the dead room and then into the mixer through channel 1.

At this point make sure that track 1 is armed in the Pro Tools Edit window. Track 1 can be armed by clicking on the small box with an R in it situated just to the left of track 1 in the edit window, (this box will light up red when armed)
A signal should be seen on the mixing desk, (channel 1) on the Pro Tools 192 interface, (channel 1) and also on the Pro Tools screen. Click on the record button at the top of the edit window and then press the space bar to start recording.
This is done using the same process as for powering up but in the reverse running order


No comments:
Post a Comment