This weeks forum topic was collaborations. The forum started off with Stephen Whittington giving a brief speech on collaborations and some of the factors that may need to be considered. Mr. Whittington touched on points such as; the possibility of collaborators speaking different languages, collaborations between different fields of expertise, what is expected of you, and the need to sometimes have to compromise.
After this short speech the first student presenter was introduced, David Dowling. His presentation was on the collaboration between a conductor of western art music named Michael Kamen and the band Metallica. He discussed some of the considerations that had to be considered when placing a rock band on the same stage as an orchestra such as clear, see through baffles and the problems with separating sound.
Next was Vinny Bhagat's presentation on Trilok Gurtu, a percussionist who plays a number of traditional Indian instruments, and how he collaborates with other artists to produce a fusion between traditional Indian instruments and modern day instruments such as bass, guitar, etc.
William Revill discussed how collaborations are now being conducted over the Internet using the Microsoft program XACT. He spoke of some of the problems faced with collaborations between people working with sound (ie: the need for a space on their own) and how this program allows for each separate participant in the collaboration to be aware and access work done by the other participants.
The last presenter was Khaled Sanadzadeh. In his presentation he spoke of his own opinions on 'World' music and that in his opinion that collaborations between 'world' music and western music is a one way process. He touched on the effects of commercialism and the fact that a number of western instruments are not able to play some traditional music. The discussion was then opened up to the forum to discuss.
Overall I think the forum covered a number of interesting points in regards to collaboration.
Saturday, March 24, 2007
CC 1 week 4
This weeks exercise is a 45 second soundscape made from our previous edited paper samples. My first attempt at this soundscape was mediocre as I was using the samples as they were last week. Not being satisfied with this, I decided to re-edit some of the samples to cater for this soundscape. Most of the re-editing involved pitch shifting, deleting higher frequencies and time stretch.
As required for the exercise, the soundscape below has images of paper to attempt to explain the setting. An explanation of what these images are supposed to mean will follow these images.
soundscape1mp3
Image 1

Image 2

Image 3

Image 4

As required for the exercise, the soundscape below has images of paper to attempt to explain the setting. An explanation of what these images are supposed to mean will follow these images.
soundscape1mp3
Image 1

Image 2

Image 3

Image 4

A storm (sounds during the entire soundscape), sounds of wind and thunder (Image 1), then footsteps are heard coming from the distance (Image 2), he rings the doorbell to the house (Image 3), as the door opens a chainsaw is started up and a scream can be heard (Image 4)
AA 1 week 4
Audio Arts
This weeks task is to draw up a signal flow chart. Flow chart 1 is the chart for the rhythm section. Flow chart 2 is the flow chart for all of the overdubs.
Flow Chart 1

Flow Chart 2

*Please note that all signals from the dead room will go in through channel one in the dead room junction box. The canon lead that corresponds to the assigned track, (eg. VOX 1 Track 12) will then be plugged in to the output of dead room one in the junction box of studio two, ie: the signal will flow from the mike in the dead room, in to input 1(dead room), out of output 1 (deadroom) via the canon lead assigned to the required track/cannel and into the mixing desk.
This weeks task is to draw up a signal flow chart. Flow chart 1 is the chart for the rhythm section. Flow chart 2 is the flow chart for all of the overdubs.
Flow Chart 1
Flow Chart 2

*Please note that all signals from the dead room will go in through channel one in the dead room junction box. The canon lead that corresponds to the assigned track, (eg. VOX 1 Track 12) will then be plugged in to the output of dead room one in the junction box of studio two, ie: the signal will flow from the mike in the dead room, in to input 1(dead room), out of output 1 (deadroom) via the canon lead assigned to the required track/cannel and into the mixing desk.
Monday, March 19, 2007
Forum week 3
This weeks Forum was some what of an introduction to aleatory or chance music which was presented by David Harris. The students in the forum were all given parts in a forty-five minute performance, these parts consisted of keyboard parts, singing parts, spoken parts, guitar parts and finally percussion parts. The students were all given a copy of the content of there own particular parts, these content sheets rather than being in metered time consisted of a time frame in which they were to perform their parts eg. in my example for a spoken part, the line/s were given, then a indication of when to recite the line ie. 2.00(minutes) to 3.30(minutes). This was done for all parts and meant that while content and a rough indication of time was given, the final result of how the piece sounded would also depend on the performers or as is state on Wikipedia (2007), "aleatoric processes which have been fixed in their outline but the details of which are left to chance".
While a lot is left to chance, as stated above, from this performance I could see that certain facets other than the content could be influenced by the composer especially in regards to crescendos and diminuendos ie: if several parts were given the same 10-15 second interval where they were to perform their part, most likely a crescendo effect would occur, where as if there was a period where all parts had an interval of say 3 minutes there may, at some time during this period be areas of silence or diminuendo.
All in all I think it would have been interesting to maybe have a shorter performance that was recorded, then played back to the students in the second half of the forum for a kind of informal analysis.
CC 1 week 3
Week three in Creative Computing sees us continuing along in the sme vain as in week 2, this being the editing of the same paper sounds recorded for last weeks exercise. The difference this week is that these paper sounds are to be edited using Spear, (Sinusoidal Partial Editing Analysis and Resynthesis) a freeware piece of software that allows to edit sound in the frequency domain as opposed to last weeks exercise using Peak LE which edits in the time domain. Below are some examples by myself of editing sound using Spear.
Sample 1
Sample one used a recording of paper held between the thumbs and blown into similar to the way used when making a sound with a gumleaf. The point where the frequency of the sound reached its peak, the Time Selection tool was used to select the all of the partials from this point to the end of the sample. this section was then Sliced to separate and this section of partials was then dragged to the right, using the Time Offset tool. One partial was then selected from the left hand side of the split sample, then whilst holding down the Shift button another partial was selected from the right hand side. The two selected partials were then joined using Join from the Edit menu. This was then repeated numerous times until multiple partials were joined.
gumjoin.mp3 (This sample has the unedited sample first, then the edited sample)

Sample 2
Sample two used the same paper sound as sample one except that this sample was copied and pasted until there were six identical samples of this sound. Then edited sample one (above). was copied and pasted twice into this sample. These samples were then positioned horizontally using the Sound Offset tool and then manipulated vertically using the Frequency Shift tool. The aim was to recreate the same edited sample as 'Edited Sample 1 (beetpaper.mp3)' that was uploaded in week two using Peak LE (which edits in the time domain) and compare the difficulty or ease of producing a similar edited sample using Spear (which edits in the frequency domain).
beetspear.mp3

Edited Sample 3
This sample used a recording of a piece of paper rubbing against glass which produced squeaking sound with a rubbing sound in the background. The stronger high pitched partials were selected, the selection inverted and then deleted. This left behind just the squeak.
squeaknorub.mp3 (This sample has the unedited sample first, then the edited sample)

Sample 1
Sample one used a recording of paper held between the thumbs and blown into similar to the way used when making a sound with a gumleaf. The point where the frequency of the sound reached its peak, the Time Selection tool was used to select the all of the partials from this point to the end of the sample. this section was then Sliced to separate and this section of partials was then dragged to the right, using the Time Offset tool. One partial was then selected from the left hand side of the split sample, then whilst holding down the Shift button another partial was selected from the right hand side. The two selected partials were then joined using Join from the Edit menu. This was then repeated numerous times until multiple partials were joined.
gumjoin.mp3 (This sample has the unedited sample first, then the edited sample)
Sample 2
Sample two used the same paper sound as sample one except that this sample was copied and pasted until there were six identical samples of this sound. Then edited sample one (above). was copied and pasted twice into this sample. These samples were then positioned horizontally using the Sound Offset tool and then manipulated vertically using the Frequency Shift tool. The aim was to recreate the same edited sample as 'Edited Sample 1 (beetpaper.mp3)' that was uploaded in week two using Peak LE (which edits in the time domain) and compare the difficulty or ease of producing a similar edited sample using Spear (which edits in the frequency domain).
beetspear.mp3
Edited Sample 3
This sample used a recording of a piece of paper rubbing against glass which produced squeaking sound with a rubbing sound in the background. The stronger high pitched partials were selected, the selection inverted and then deleted. This left behind just the squeak.
squeaknorub.mp3 (This sample has the unedited sample first, then the edited sample)
Edited Sample 4
This sample took a 8-9 sec rip and stretched using the Time Stretch tool, out to 20 sec.
exslowrip20sec.mp3

This sample took a 8-9 sec rip and stretched using the Time Stretch tool, out to 20 sec.
exslowrip20sec.mp3
Edited Sample 5
This sample used a recording of ripping paper. The Time Region tool was then used to select increments of 0.5 sec. and Slice them to make several separate sections. Using the Frequency Shift tool region 1 moved up 500 Hz, region 2 left as is, region 3 down 500 Hz, region 4 as is, etc.
slowrip2breathe.aiff
Edited Sample 6
One strong partial was selected in this sample, the rest were deleted. This partial was then stretched, then copied and pasted so there were multiple copies of the partial. Each partial then had its frequency raised (Transform menu - Frequency Shift). The first partial was at approx. 110 Hz, each subsequent partial was the raised be increments of 110 Hz to mirror the harmonic series.
harm1.mp3
Sunday, March 18, 2007
AA 1 week 3
This weeks lecture was related to signal flow. The exercise was to get a signal from the dead room, through the mixing desk and into Pro Tools in preparation for recording.
Powering up the Studio
The first aspect of this exercise concerns the powering up of the studio. When powering up the studio there are some essential points that must be adhered to. The first is that Amps/Speakers are ALWAYS the last to be powered up, and ALWAYS the first to be turned off when preparing and finishing recording sessions. Another important point relates to the mixing desk, it is vital that the desk is neutralised before turning on, and also neutralised at the conclusion of a recording session. To help with remembering the order in which to power up the studio there is the acronym DORA, this stands for:
 After opening up a new session, a window will appear (pictured below). In this window settings can be made for 16 or 24 bit, whether to save as an AIFF etc. what Hz setting and where the file is to be saved to.
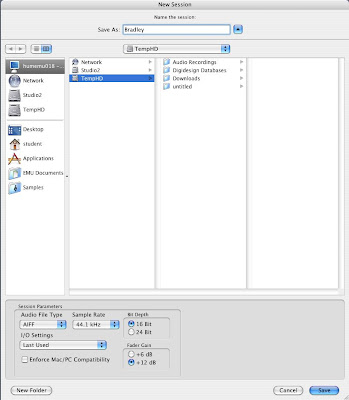 Once a new session has been opened up a track(s) has to be opened/added. This is done by going to the File menu and clicking on 'New Track'. (The shortcut is 'Shift + Apple + N') A small window will appear asking how many tracks, for this exercise we only needed one track. Below shows a Pro Tools recording session window (the big window), also to the right is the mixing window. Both are showing only one track.

Powering up the Studio
The first aspect of this exercise concerns the powering up of the studio. When powering up the studio there are some essential points that must be adhered to. The first is that Amps/Speakers are ALWAYS the last to be powered up, and ALWAYS the first to be turned off when preparing and finishing recording sessions. Another important point relates to the mixing desk, it is vital that the desk is neutralised before turning on, and also neutralised at the conclusion of a recording session. To help with remembering the order in which to power up the studio there is the acronym DORA, this stands for:
- Deck = Mains power
- Outboard = Racks
- Recorder = Pro Tools, 8 track, etc.
- Amps = Amps, powered speakers.
Below is the power up order we followed for our session in Studio:
- Turn on Mains power.
- Turn on power to the rack.(pictured below, the power switch is on the far right hand side, at the top of the rack.)

- Turn on the power to the 192 Pro Tools interface. (pictured above, the 192 is positioned on the left hand side of the rack, just under the patch bay.)
- Fire up the computer.
- Desk (check if it is neutralised) *see neutralise desk below.
- Turn on the power to the desk.
- Power up the amp/speakers.
Neutralising the Mixing Desk
The following information notes how to neutralise a mixing desk. Please note that this is how the desk should be left after a recording session:
- Every switch should be up.
- All faders should be down
The following applies to all channels from the top row of pots to the bottom row:
- The top pot/nob (mike pre-amp) turned anti-clockwise all the way.
- The next six pots/nobs, (Equalisers) should be left in the centre.
- The next six pots/nobs, (Auxiliary) turned anti-clockwise all the way.
- The bottom pot/nob, (Pan) should be left in the centre.
- The pots/nobs that aren't in the channel rows (situated on the right side of the desk) should all be turned anti-clockwise all the way.
Setting up a Recording Session with Pro Tools
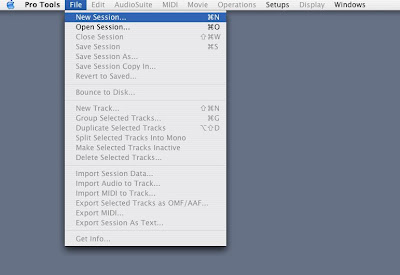
The first step is to click on the Pro Tools icon situated on the Dock at the bottom of the screen to open up Pro Tools. (note this is the process for Macintosh's with OSX) Next click on the File menu and click on 'New Session' (pictured below). A new session can also be opened up using the shortcut "Apple + N".
After opening up a new session, a window will appear (pictured below). In this window settings can be made for 16 or 24 bit, whether to save as an AIFF etc. what Hz setting and where the file is to be saved to. Once a new session has been opened up a track(s) has to be opened/added. This is done by going to the File menu and clicking on 'New Track'. (The shortcut is 'Shift + Apple + N') A small window will appear asking how many tracks, for this exercise we only needed one track. Below shows a Pro Tools recording session window (the big window), also to the right is the mixing window. Both are showing only one track.
Getting a Signal Through to Pro Tools from the Dead Room
Set up a microphone and plug it into the input for channel 1 in the junction box in the dead room. Next in the control room, patch the dead room output, (channel 1) into the input for channel 1 that leads into the desk. Pictured below is the junction box for studio 2, the row of inputs/outputs shows that this canon plug is the only one coming out of the dead room and then into the mixer through channel 1.
At this point make sure that track 1 is armed in the Pro Tools Edit window. Track 1 can be armed by clicking on the small box with an R in it situated just to the left of track 1 in the edit window, (this box will light up red when armed)
A signal should be seen on the mixing desk, (channel 1) on the Pro Tools 192 interface, (channel 1) and also on the Pro Tools screen. Click on the record button at the top of the edit window and then press the space bar to start recording.
This is done using the same process as for powering up but in the reverse running order
Wednesday, March 14, 2007
Forum week 2
This topic for this weeks forum was Originality in Music, presented by Stephen Whittington. The forum started with some quotes from Stephen ie. "I want to be original like everyone else" and "If you steal from one person it's plagerism, if you steal from many it is called research." These two quotes set the scene nicely which was to pose the question of just what is originality? This was a question I assumed I knew the answer to, that was of course until the end of the forum at which stage I was asking myself all sorts of questions.
The bulk of the forum consisted of Stephen Whittington presenting examples of musical examples and anecdotes to the forum. As each example was presented, there was no advice or indication from Stephen as to whether these examples were definately original or not. The main point of these examples were to get the forum thinking, and querying notions of originality.
Listed below are some of the examples from the forum which in my opinion posed the greatest questions:
- Christian Marclay: A composer the takes pre-existing materials and arranges it in many ways.
- John Zorn: He writes examples on filing cards, when he has enough cards he shuffles the cards and deals them out and pieces them together to form a work.
- David Cope: He uses a computer to compose his works. In one example he analysed the style of Mozart, fed these parameters into the computer along with a number of pieces by Mozart. The computer then produced a number of "original" pieces based on the guidelines programmed into it. (Stephen Whittington then played one of these compositions)
These examples posed questions, can reworking others original material make a new 'original work'? Does original works have to be written by something living? Does using someone elses style/rules of composition constitute originality? On this last note the example given of Erik Sati is an interresting point. Sati's works, prior to learning composition formally, were considered to be great and original. After training and formally learning the 'rules of composition his music wasn't quite as successful.
To conclude I quote H.V. Spanner (1952) who stated in his article 'What is Originality' in The Musical Times, that "It is indeed impossible to define originality."
Spanner H. V. 1952, <page">http://www.jstor.org/view/00274666/ap030583/03a00050/0?currentResult=00274666%2bap030583%2b03a00050%2b0%2c03&searchUrl=http%3A%2F%2Fwww.jstor.org%2Fsearch%2FBasicResults%3Fhp%3D25%26si%3D1%26Query%3D%2522what%2Bis%2Boriginality%2522%26wc%3Don>page 311 Accessed 12/03/07
Tuesday, March 13, 2007
CC 1 week 2
Creative Computing
This weeks exercise was to record a number of samples of sounds using only an A4 sheet of paper and then to edit/manipulate those samples. To record the raw paper sounds I used a SM-58 microphone and recorded the signal into Pro-Tools. I then exported the files as AIFF's and imported them into Peak LE for editing.

Edited Sample 2

This weeks exercise was to record a number of samples of sounds using only an A4 sheet of paper and then to edit/manipulate those samples. To record the raw paper sounds I used a SM-58 microphone and recorded the signal into Pro-Tools. I then exported the files as AIFF's and imported them into Peak LE for editing.
The different ways of producing the paper sounds were all recorded onto one AIFF file (above) and markers were inserted to indicate the points where each different process of paper manipulation began.
Marker 1: Paper was held between the thumbs and blown into (like when whistling with a gumleaf)
Marker 2: Paper was grabbed from the outside edges and pulled apart quickly
Marker 3: Ripping the paper slowly
Marker 4: Ripping the paper quickly
Marker 5: Scrunching the paper up
Marker 6: Rubbing the paper up against glass
Marker 7+ : Wobbling the paper quickly, slowly walking away and towards the microphone.
Edited Sample 1
This sample used one of the raw paper sounds from marker 1. The sample was then copied and pasted until there were eight samples. Samples four and eight then had a segment of the middle of their waves copied and then pasted (blending was on) midway through the sample to lengthen them. The fourth note was then lowered in pitch by 200 cents (using the Apple plugin AU Pitch), notes five, six and seven were lowered 100 cents, (same process) and the final note was also lowered. (I think I may have lowered it by the wrong amount. I was trying to do a paper version of Beethoven's Fifth.) The sample is below titled beetpaper.mp3.
beetpaper.mp3Edited Sample 2
In this sample I used two sounds from marker 2 to try to replicate a drum beat. This involved the positioning of the two different sounds so that they sound at the right times, then copy and paste. If a longer sample was required a loop could be set up. The drum sound sample is below titled bradxdrum-1.mp3 along with a screen shot of what the drum beat looks like.
bradxdrum-1.mp3

Edited Sample 3
This sample used a marker 4 sound of ripping paper quickly. The last part of this wave was copied and pasted numerous times to create an echo effect. All the pasted parts were then faded out over an extended period. Sound sample below titled ripecho.mp3.
Edited Sample 4
In this sample a raw sound from marker 3 was used. The only effects used was fade in and fade out as there was unwanted noise which the fades helped to cover. Sound sample below titled slowrip.mp3.
Edited sample 5
Sample five has no effects but below shows a screenshot of the two different regions marked out. The sound sample is also below titled crackle.mp3.
crackle.mp3
Edited Sample 6
Sample six used one of the sounds from marker 1. This sound then had its tempo slowed down without effecting the pitch. This sample was edited on Audacity. (note though we were supposed to use Peak LE and not use any effect like this I thought I would still include this as it surprised me.)
Monday, March 12, 2007
AA 1 week 2
Audio Arts Session Plan
This session plan is for a friends song which I hope to record at a later stage during this course.
Pre-production
DISCUSSIONS WITH THE CLIENT: Felix Kerry
The client has supplied a CD recording of a live performance of the song to be recorded. He has expressed that the studio recording be more atmospheric as well as adding Piano and Percussive elements to the song.
EXPERIENCE: The client (Vocalist) has a reasonable amount of experience performing, but little to no experience in the studio. His backing band however is quite familiar with the techniques of studio recording. *Possibly allow for a little extra time when recording vocal overdubs.
Recording Order
1:) Rhythm section: Drums, Bass, Guitar and Keyboards
2:) Overdub: Piano
3:) Lead vocal
4:) Backup vocals
5:) Overdubs: Chimes, Gong
Track Instrument Microphone
1 Kick - Beta 52A
2 Tom Rack - Beta 56A
3 Floor Tom - MD-421
4 Snare - MZ-204
5 H/Hat – KM-84i
6 OH.L (Ride Side) – KM-84i
7 OH.R (H/Hat Side) – KM-84i
8 Bass – D/I
9 Guitar – D/I
10 Piano – U-89i
11 Piano (Room) – NTV
12 Vocal 1 (Lead Vocal) – C-414 BULS
13 Vocal 2 (Backing Vocals) – C-414 BULS
14 Percussion – KM-84i
15 Chimes – NT3
16 Sample – n.a.
NOTES: Keyboards will be recorded (D/I) on track 14 as guide and reference until piano overdub is recorded, then will be deleted to make way for percussion overdub.
Production Schedule
1:) SONG: Let me share a breathing space
INSTRUMENTATION: Drums, Bass, Guitar, Keyboards, Piano, Vocals, Chimes, Gong
SONG FORM: The song consists of Verse, Bridge and Chorus sections. Generally the verse will be ambient (predominantly Piano and Bass with very light drums/percussion, whilst the bridge and chorus will utilise the entire rhythm section. The second to last chorus will be acapella with possibly some percussion/chimes.
NOTE: As the song is strongly based on a piano riff, Keyboards will be D/I as a guide for other instruments during the recording of the rhythm section and later scrapped for the overdub of piano.
COMMENTS: Keyboards will be recorded (D/I) with rhythm section as other instruments take their cue from them. Keyboards will then be replaced by Piano overdub. A sample of wind blowing will also be incorporated at various points.
Microphone Input List
1 Kick - Beta 52A
2 Tom Rack - Beta 56A
3 Floor Tom - MD-421
4 Snare - MZ-204
5 H/Hat – KM-84i
6 OH.L (Ride Side) – KM-84i
7 OH.R (H/Hat Side) – KM-84i
8 Bass – D/I
9 Guitar – D/I
10 Piano – U-89i
11 Piano (Room) – NTV
12 Vocal 1 (Lead Vocal) – C-414 BULS
13 Vocal 2 (Backing Vocals) – C-414 BULS
14 Percussion – KM-84i
15 Chimes – NT3
16 Sample – n.a
Instrument Layout
RHYTHM SECTION RECORDING: Keyboards will be located in front of recording booth, side on to window.Bass and Guitar in front of Keyboards to provide good eye contact for cues. Drums in the corner of studio 1, no baffles required as all other instruments for rhythm section are D/I.
PIANO: Piano will be situated window side of the studio and miked. Second microphone will be setup at the opposite end of the studio.
Session Sheet
Below is the session sheet for Let me share a breathing space, by Felix Kerry.
* * *

Wednesday, March 7, 2007
Forum week 1
Week ones Forum for degree students was pretty much a 'getting to know you' session. There was a mixture of first, second and third year degree students, three post graduate students and of course the staff. Everyone, in turn, took a couple of minutes to introduce themselves to the Forum followed by a brief description of themselves. From this information it can be deduced that with a majority of the forum being guitarist, that WE hold the balance of power in this forum (just kidding). After all the degree students had introduced themselves to the forum the dilpoma and certificate four students joined in in our forum, this being one of the few times of the year that this will occur. This pretty much concluded this weeks Forum.
Tuesday, March 6, 2007
CC 1 week 1
In Audio Arts this week the class looked at Desktop Music Environments. OSX, an Operating System that runs on Macintosh's was the classes main focus. Unfortunately, due to the computer lab not being operational, the class could not put into practice what had been relayed to us on topics such as OSX system preferences and Audio MIDI Setup.
Apologies for this entry being so short and although we were informed that this post was not necessary, (due to the computer lab being not operational), I decided to publish this entry primarily to make sure that my blog had separate posts for each new entry.
Monday, March 5, 2007
AA 1 week 1
In the first Audio Arts class much of the class was taken up with the compulsory reading of the University's guigelines and objectives jargon. After these formalities were through Steve Fieldhouse, the course lecturer, proceded to again stress the policies of no food, drink or smoking in the studio. It was also stress that mobile phones are to be switched off and not just put to silent whilst in the studio as this can interfere with audio processing.
In the time remaining the class was introduced to some basic housekeeping rules of the studio. These rules included 1:)that all microphones are to be stored with their clips (important as some microphones have specialised clips) 2:) that leads be stored on the hose reel, remembering to be watchful of any loops or tangles that may begin to form 3:) that mike stands be collapsed completely and stored in the cupboard in the studio space (note that mike stands should be loosened before any adjustments are made).
The final part of the session was concerned with Occupational, Health and Safety. It was relayed to the class that 1:) when lifting heavy objects always bend at the knees and not to lift with ones back (also not to attempt to lift any item that may be too heavy such as the piano) 2:) in the case of someone being slumped over do not grab them (in case of electrocution) 3:) the final point stressed was that leads must not be suspended off the ground as they are a tripping hazard.
Subscribe to:
Posts (Atom)